

Polyurethane/polyurea spraying machine manufacturer, the equipment is suitable for thermal insulation, waterproof, anti-corrosion, pouring, etc.
Polyurethane spraying needs to be done in many places. Presumably many people have seen the construction process of polyurethane spraying, but they are completely ignorant of the construction points of polyurethane spraying, and do not know what the professional process is like. Today I will show you all Explain the construction process of polyurethane spraying.
1. Basic interface processing
The base wall should meet the requirements, the flatness of the wall should be 5-8mm, and the verticality should be within 10mm.
A: The wall should be cleaned to ensure that the wall is free from laitance, oil stains, dust, etc. If the deviation of the base layer is too large, mortar should be applied for leveling.
B: The defect on the wall has been repaired with cement mortar.
C: When the wall protrusion is greater than or equal to 10mm, it should be removed.
D: The buried pipelines, wire boxes and embedded parts on the wall should be installed in advance, and the influence of the thickness of the insulation layer should be considered.
E: Before spraying polyurethane rigid foam, use plastic film, waste newspaper, plastic board or wood board, plywood to cover and protect windows, doors and other non-coating materials. The roof door and window frame should be sprayed with polyurethane rigid foam before installation to avoid pollution.
2. Hanging horizontal and elastic control line
Expansion bolts are placed under the top wall and bottom wall as the hanging point of the large wall hanging wire. The theodolite is used to install the hanging wire for skyscrapers, and the large wire is used for multi-storey buildings to hang the thin wire hanging wire, and tighten it with a wire tensioner. Install steel vertical lines at the large yin and yang corners of the wall, and the distance between the steel vertical lines and the wall is the total thickness of the thermal insulation layer. After hanging the line, first check the flatness of the wall with a 2m bar ruler on each floor, and check the verticality of the wall with a 2m support board. The project can only be carried out when the flatness requirements are met.
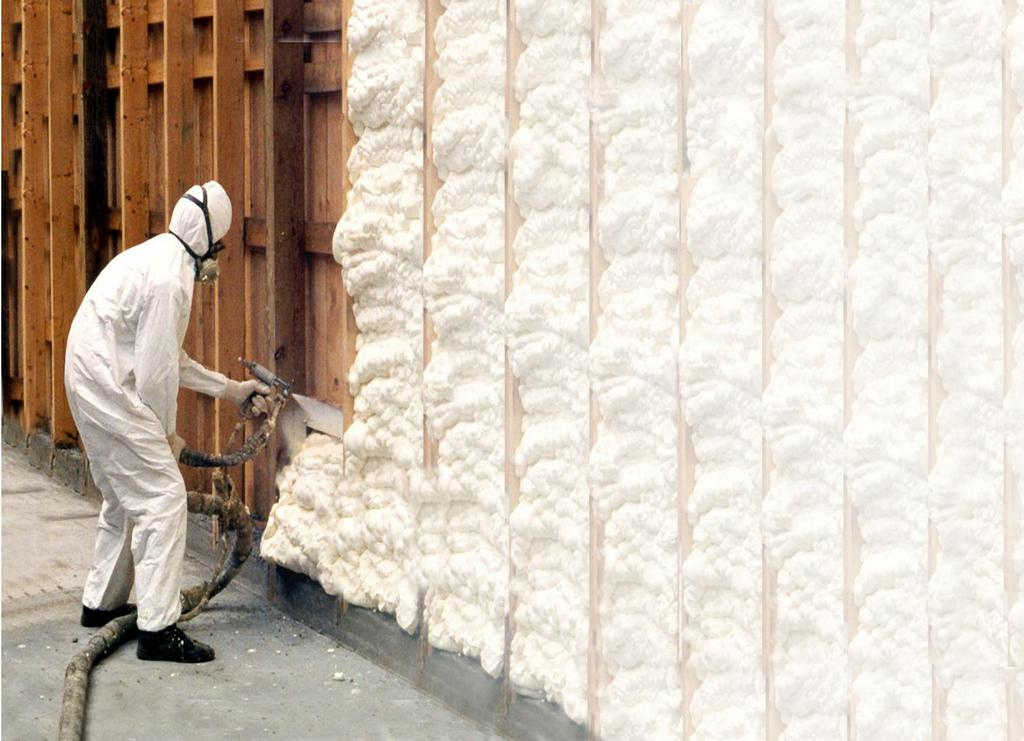
3. Spraying rigid foam polyurethane
Turn on the polyurethane spraying machine to spray the rigid foam polyurethane evenly on the wall.
A: Spraying should start from the edge, after foaming, spray along the foaming edge.
B: The thickness of the first spray should be controlled at about 10mm.
C: The thickness of the second pass should be controlled within 15mm until the thickness required by the design.
D: After the polyurethane rigid foam insulation layer is sprayed, the thickness of the insulation layer should be checked as required, and the quality inspection should be carried out according to the requirements of the inspection batch for inspection records.
E: After spraying the polyurethane insulation layer for 20 minutes, use a planer, a hand saw and other tools to start cleaning, trim the shading, protect the parts and the protruding parts that exceed the specified thickness by 1cm.
4. Painting the interface mortar
The polyurethane interface mortar treatment is carried out 4 hours after the polyurethane base layer is sprayed, and the interface mortar can be evenly coated on the polyurethane insulation base layer with a roller. In order to strengthen the combination between the insulation layer and the flat layer, prevent cracking and falling off, and also prevent the polyurethane insulation layer from being exposed to sunlight and causing yellowing and chalking. After spraying the polyurethane interface mortar for 12-24 hours, the construction of the next process is carried out. Note that the polyurethane interface mortar cannot be sprayed on rainy days.
5. Construction of anti-cracking mortar layer and finishing layer
(1) Paint finish
①Apply crack-resistant mortar and lay down alkali-resistant mesh cloth. The alkali-resistant mesh is about 3m in length, and the size is pre-cut. The anti-cracking mortar is generally completed in two passes, with a total thickness of about 3mm to 5mm. Immediately after wiping the crack-resistant mortar with an area equivalent to the mesh cloth, press the alkali-resistant mesh cloth with an iron trowel. The overlapping width between the alkali-resistant mesh cloths should not be less than 50mm. Immediately press the alkali-resistant mesh cloth with an iron trowel in the order from left to right and from top to bottom, and dry overlapping is strictly prohibited. The yin and yang corners should also be overlapped, and the overlap width should be ≥150mm, and the squareness and verticality of the yin and yang corners should be guaranteed. The alkali-resistant mesh cloth should be contained in the anti-cracking mortar, and the paving should be smooth and wrinkle-free. The mesh can be vaguely seen, and the mortar is full. Parts that are not full should be immediately filled with anti-cracking mortar for a second time to level and compact.
After the anti-crack mortar construction is completed, check the smoothness, verticality and squareness of the yin and yang corners, and use anti-crack mortar for repair if it does not meet the requirements. It is strictly forbidden to apply ordinary cement mortar waistline, window sleeves, etc. on this surface.
②Scrape the flexible water-resistant putty and apply the finishing paint. After the anti-cracking layer is dry, scrape the flexible water-resistant putty (successful for many times, the thickness of each scraping is controlled at about 0.5mm), and the finishing coating should be smooth and clean.
(2) Brick finish
①Apply crack-resistant mortar and spread hot-dip galvanized welded wire mesh.
After the insulation layer is checked and accepted, the anti-cracking mortar is applied, and the thickness is controlled at 2mm to 3mm. Cut the hot-dip galvanized welded wire mesh according to the structural size, and lay it in sections. The length of the hot-dip galvanized welded wire mesh should not exceed 3m. In order to ensure the construction quality of the corners, the hot-dip galvanized welded wire mesh at the corners is pre-folded into a right angle before construction. In the process of cutting the mesh, the mesh should not be folded into dead folds, and the mesh pocket should not be formed during the laying process. After the mesh is opened, it should be laid flat in turn in the direction. Zinc welded wire mesh to make it close to the surface of anti-crack mortar, and then anchor the hot-dip galvanized welded wire mesh on the base wall with nylon expansion bolts. Flatten the unevenness with a U-shaped clip. The lap width between hot-dip galvanized welded meshes should not be less than 50mm, the number of overlapping layers should not be greater than 3, and the lap joints should be fixed with U-shaped clips, steel wires or anchor bolts. Cement nails and gaskets should be applied to the end of the hot-dip galvanized welded wire mesh on the inner side of the window, parapet wall, settlement joint, etc., so that the hot-dip galvanized welded wire mesh can be fixed on the main structure.
After the hot-dip galvanized welded wire mesh is laid and passed the inspection, the anti-crack mortar shall be applied for a second time, and the hot-dip galvanized welded wire mesh shall be wrapped in the anti-crack mortar. The cracked mortar surface layer should meet the requirements of flatness and verticality.
②The veneer tile.
After the anti-crack mortar construction is completed, it should be properly sprayed and cured, and the veneer tile paste process can be carried out after about 7 days. The thickness of the brick bonding mortar should be controlled within 3mm to 5mm.
Post time: Sep-27-2022